


Quick Jump:
One of the first annoyances I noticed when playing the Twilight Zone was the "Shoot here to Load Gumball w/Lit" sign, which is placed squarely over the outer right loop: it was positioned in such a way that it blocked the player's view of the loop, and since many shots feed down that loop to the right flipper, being able to see the ball coming tends to be kind of important.
Of course, I realized right away that if I had noticed this annoyance after less than a week of ownership, someone else had probably also had this problem and was selling a solution to it.
Sure enough, Tom Wible was selling a "gumball sign adjuster" on his site. Basically a sandblasted aluminum bracket, you remove the screws of the gumball sign arm, pivot the sign back on the right side, then clamp down the bracket over the existing sign arm.
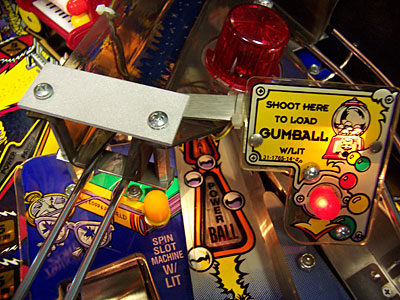
Gumball Sign Adjuster
You can actually do this mod without the bracket, simply by unscrewing the right screw, moving the sign arm back and tightening the screw so that it clamps down on the edge of the arm. No matter how you do this mod, it really does improve your view of the lane, which has greatly helped in my Hitchhiker and Camera shots from the upper right flipper.
Click the "Play" button to see the improved view of the spiral lane
during gameplay
Click here to launch the video in a separate window
The adjuster sells for $7.99 from Tom Wible, which seems a bit high for a piece of metal, although I do agree the sandblasted texture looks nice and it does make the mod look a bit more "factory original."
Mini-Playfield Custom Lamp Mod
The "street lamp" over the "Power" mini-playfield is a pretty drab affair: not only is it non-descript looking, it also blocks the view of the gumball and in general feels like it was a design afterthought. Is there a mod to address this? Of course there is — this is the Twilight Zone, after all, where anything can happen.
Enter the custom lamp mod from David F. Kvasnicka, aka "Yelobird1" on eBay:
The custom mini-playfield lamp
A direct "swap out" replacement for the original lamp, it adds a cut-out Twilight Zone logo on the sides, with red plastic behind the cutout. It may not sound like much, but it does make a noticable difference in the lamp's appearance:

Before and after the lamp replacement
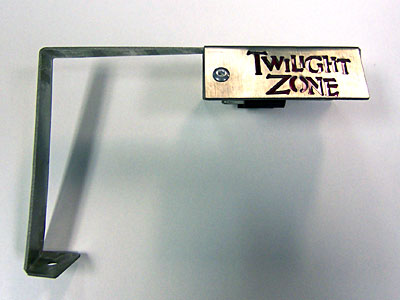
Installation is fairly straight forward, and the most tedious part of swapping out the exisiting lamp is de-soldering the wires and soldering them to the new lamp. Once plugged in and installed, it looks great, and it looks even more dramatic when lit:

Are you ready to battle?
David's custom lamp sells for $49 (+$6 shipping) on eBay (search for seller "yelobird1"). It's a bit pricey, but I really do like the glowing logo, and the cutouts even allow more light on the miniplayfield, an unexpected plus.
455 light replacements in the backboard
When the Twilight Zone pinball was released, it used six 545 flasher bulbs behind the translite, which helped the "starry night" motif in the artwork. Unfortunately, these bulbs are now extremely hard to find and very expensive if you do manage to find them. The solution is to replace the 545 flasher bulbs (basically a flashing version of the 555 bulbs) with 455 bulbs, which are still available and much cheaper.
The only problem? 455 bulbs don't use the existing wedge sockets, but instead use #44-style bayonet sockets. This means a bit of soldering and stapling, as you need to remove each of the black wedge sockets in the backboard, then staple in an E-120-176 small bayonet lamp socket, then solder the existing wires back to the new socket.
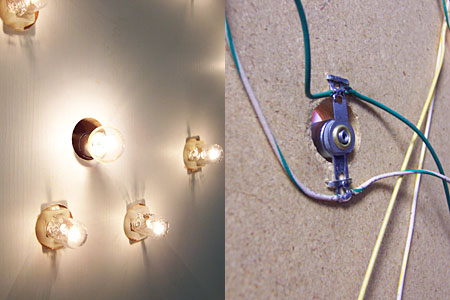
545 to 455 Flasher Lamp Replacement
This mod took a bit more time to complete than some of the others, mainly because of the incredibly awkward work environment: to staple and solder the new sockets in, I had to either lean completely over the pin from the right side of the pin, or "limbo" under the light door from the left side. Either way, it was a royal pain, but luckily there were only six sockets to replace.
The sockets cost about $.89 each, so for about $5.34 + $7 for a box of 455 lamps, plus some sweat, swearing, and soldering iron burns, you can add blinky lights back to your Twilight Zone backbox (and I'll do anything for blinky lights...)
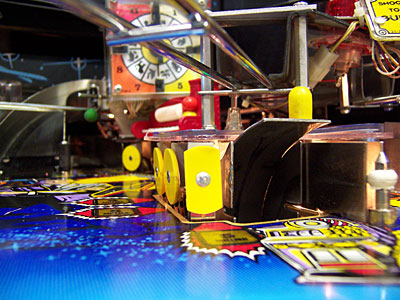
Another area of concern on the Twilight Zone playfield is the "greed" target located right next to the slot machine scoop. Because it's so close to the flippers this target takes an enormous beating, and it just wasn't designed to handle the abuse.
Worse, as the target gets bent back from all the high-speed impacts, it pulls back and exposes the edge of the scoop assembly to ball hits, which will in time break the welded joints on the scoop. In addition, a bent target can lead to increased airballs, which are never a good thing in a pinball machine.

The original broken "greed" target next to the slot machine scoop
There have been some aftermarket attempts to reinforce this target by propping it up with steel rods or stiff wire, but I feel that the best solution by far are the newly redesigned and reinforced targets from Steve Young's The Pinball Resource.
Featuring a heavier gauge mounting bracket and an "L" shaped metal supporting brace, this target is built for serious abuse. The Pinball Resource has two versions of this enhanced bracket: Williams part number A-18530-6E (the "E" is for "Enhanced"), which is used for the yellow greed target, and A-18530-2E, which is used for the green "clock" target.
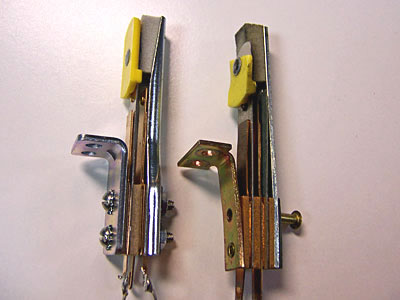
The Enhanced target (left), and the original target (right)
(Note the original's broken rivet and bent mounting bracket)
These targets take a little bit of work to install — nothing too involved, but you will need to solder the new target to the existing wires. In addition, you may need to reinforce the mounting holes if they've been stripped — the "Lost in the Zone" pinball repair video mentions a great trick for restoring stripped target mounting holes: take a toothpick, dip it in glue, then stick it in the hole and snap it off. This gives the screw something to grip, and the glue helps to firmly secure everything when it sets.
I replaced both the broken greed target and the clock target on my machine, and it made an immediate difference in gameplay, not only with preventing airballs, but also helping with my slot machine scoop shots. (Perhaps it's just my imagination, though!)
This slot target mod for the Twilight Zone pinball is explained in exacting detail in the always excellent Pinball Repair Guide at Marvin's Marvelous Mechanical Museum. I highly recommend this guide, as it has helped me repair several electrical problems with my pins, and has helped me to decide when a problem is something I can fx myself, and when it's something best left to the experts (speaking of repair experts, I really recommend The Coin-Op Cauldron for pinball board repairs!)
The new target, installed and ready for a beating
The Pinball Resource sells these targets for $8.22 each, and I highly recommend them as insurance against future playfield damage.
| < Previous Page | |
